Download Latest Magisk zip v25.1 and Magisk Manager 8.0.7 and Root your phone
On this page, we will share the full instructions to download and install Magisk zip on your Android Phone. This tutorial is also for the newbies/noobs who never installed root on their phones.
Magisk, the well-known tool for acquiring root permissions on Android devices, has received a new update that fixes some unexpected bugs and introduces the obfuscation feature. If you already have magisk root on your phone, then you can simply upgrade your phone to Magisk Zip v25.1 and Magisk Manager apk to 8.0.7. If you are installing Magisk root on your phone for the first time, then you can simply follow our instructions to install it on your phone.
Customizing an Android smartphone and performing advanced tweaks like flashing custom kernels, custom ROMs, overclocking, and changing system settings is fun, but you need root access to your device to be able to do these. Some time ago, SuperSU was the popular way of gaining root access on an Android smartphone be Magisk has become the go-to way of rooting a smartphone since its release. You can easily manage root access with the Magisk Manager apk and implement many functionalities with the various modules available.
There are many root apps available out there that you can use to gain root access on your Android device, but perhaps the simplest and easiest to use is Magisk. Magisk is an Android utility that grants you a systemless root on your Android device and manages an application called Magisk Manager.
Also Read
Fix: Bootloop After Installing or Updating Magisk on Android Phone
PAGE CONTENTS
- What is Magisk?
- What is Magisk Manager?
- Advantages of Magisk
- Why is Magisk so important?
- Magisk Modules
- New Magisk v25.1 Changelog:
- New Magisk v25.0 Changelog:
- Magisk Manager Changelog:
- Download Magisk Zip and Magisk Manager
- Steps to Install Magisk Zip on your phone:
- Method 1: Install using TWRP Recovery
- Steps to Install TWRP Recovery:
- Pre-Requisite:
- Installation Guide:
- Install Magisk using TWRP Recovery
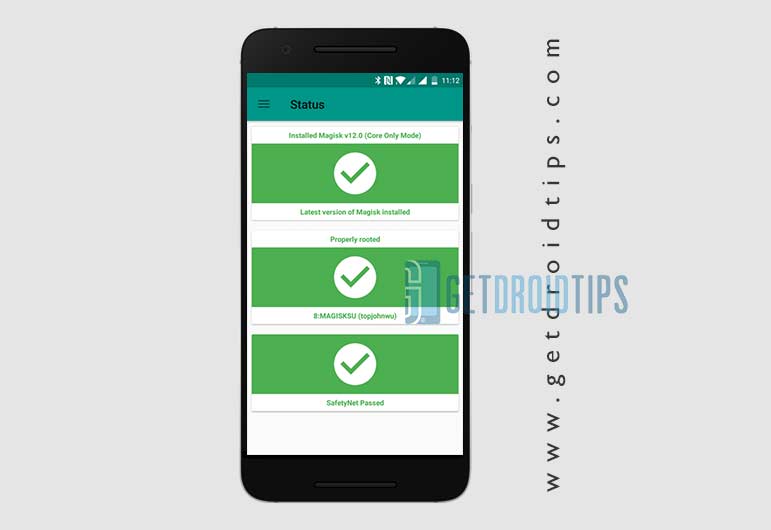
- How to Verify if your phone has a systemless root?
- Method 2: Install Magisk using Patched Stock Boot Image
- Requirements:
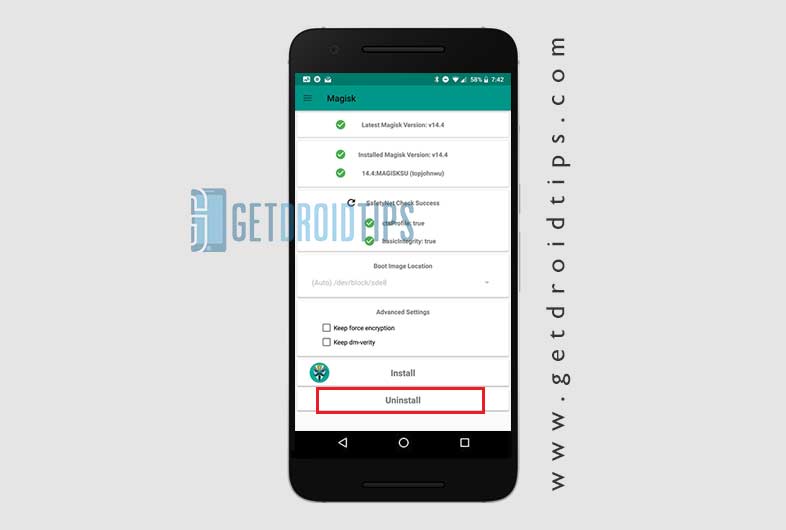
- How to Uninstall Magisk and Unroot Android
What is Magisk?

Among the plethora of options that an unlocked Android device provides, the most important one is the ability to gain administrative privileges or system-level access. In simpler terms, this is known as rooting your device. Earlier, people used to root their devices via SuperSu. However, the thing was that it directly modified the system partition. This was fine until Google released the SafetyNet mechanism. With this mechanism in place, if there was any tweak made to your device’s system partition, the SafetyNet check will fail, and this will result in your inability to use most of the apps.
This is where Magisk came into the picture. Developed by topjohnwu, Magisk is a flashable ZIP file that can root your device “systemless”. That is, it makes no changes to your system partition. Whatever changes took place, it was stored in the boot partition. As a result, when Google checks for the SafetyNet trip, your device will successfully pass this test. This is one major reason why Magisk is the preferred method to root an Android device.
Magisk is an open-source rooting app based on phh supersuser. It works on any device running Android Lollipop 5.0+.
What is Magisk Manager?
While Magisk is a flashable ZIP, Magisk Manager is an APK file that could be installed on any Android device, whether rooted or not. There are quite a few reasons that you need to use this tool. To begin, if your device doesn’t have a working TWRP Recovery, then you cannot use the Magisk ZIP, and the Magisk Manager becomes the sole way of rooting your device.
Furthermore, it provides a rooted device an interface to interact with apps that ask for root permissions. Likewise, there are tons of Magisk Modules that you could install from this app itself. And if you need to unroot your device for some reason, that could easily be done via the app as well. Whether or not your device has Magisk ZIP Installer, Magisk Manager is the absolute necessity for a rooted device.
10 Reasons to Root Your Phone in 2021
Advantages of Magisk
- The main Advantage is their systemless root: You can carry out any system or vendor modification on your Android smartphone without tampering with the system partitions.
- MagiskSU: You have the option to Grant or Deny the permission of any application
- Magisk Manager: You have the ability to install new updates and add or delete the modules on your phone. With Manager, you can also hide the root to bypass the SafetyNet check, download modules, and you have the option to Grant or Deny the permission of any application.
- ByPass SafetyNet Check: Google’s SafetyNet detects when the system has been tampered with and blocks certain apps from working properly.
- OTA Updates: With Magisk, you can also enjoy seamless OTA updates without any problem.
- Install Systemless Xposed: You can install the Magisk modules to tweak, enhance, and add functionality to your device. You can use them for everything from improving battery life to installing iOS emojis on your Android phone.
Magisk Modules
Like the Xposed Installer, the Magisk has its own modules that the users can install and benefit from. You would find many modules like Busy Box Installer, AdBlock, Action Launcher, and much more. Installing a module is not difficult; all you need to do is select the module and tap on install.
New Magisk v25.1 Changelog:
- [MagiskBoot] Fix ramdisk backup being incorrectly skipped
- [MagiskBoot] Add new feature to detect unsupported dtb and abort during installation
- [Zygisk] Change binary hijack paths
- [App] Fix incorrect recovery mode detection and installation
- [MagiskInit] Fix config not properly exported in legacy SAR devices
- [General] Enforce the Magisk app to always match or be newer than magiskd
- [MagiskInit] Update 2SI implementation, significantly increase device compatibility (e.g. Sony Xperia devices)
- [MagiskInit] Introduce new
sepolicyinjection mechanism
- [MagiskInit] Support Oculus Go
- [MagiskInit] Support Android 13 GKIs (Pixel 6)
- [MagiskBoot] Fix vbmeta extraction implementation
- [App] Fix stub app on older Android versions
- [App] [MagiskSU] Properly support apps using
sharedUserId
- [MagiskSU] Fix a possible crash in
magiskd
- [MagiskSU] Prune unused UIDs as soon as
system_serverrestarts to prevent UID reuse attacks
- [MagiskSU] Verify and enforce the installed Magisk app’s certificate to match the distributor’s signature
- [MagiskSU] [Zygisk] Proper package management and detection
- [Zygisk] Fix function hooking on devices running Android 12 with old kernels
- [Zygisk] Fix Zygisk’s self code unloading implementation
- [DenyList] Fix DenyList on shared UID apps
- [BusyBox] Add workaround for devices running old kernels
Old Magisk Changelog
- Fix sepolicy rule migration when upgrading
- A lot of stability changes and minor bug fixes
- Collect device properties, app logcat, and Magisk logs when saving logs in the logs menu
- 100% full app rewrite! Will highlight functional changes below.
- Add detailed device info in home screen to assist user installation
- Support Magisk v21.0 communication protocol
- Support patching modern Samsung AP.tar
- Magisk-v25.1.zip – Stable
- Magisk-v25.0.zip – Stable
- Magisk-v24.3.zip – Stable
- Magisk-v24.2.zip – Stable
- Magisk-v24.1.zip – Stable
- Magisk-v24.zip – Stable
- Magisk-v23.zip – Stable
- Magisk-v22.1.zip – Stable
- Magisk-v22.0.zip – Stable
- Magisk-v21.4.zip – Stable
- Magisk-v21.2.zip – Stable
- Magisk-v20.1.zip – Stable
- Magisk-v20.4.zip – Stable
- Magisk – v20.4.zip – Beta
- Magisk-v20.3.zip – Stable
- Magisk – v20.3.zip – Beta
How to Fix Magisk SafetyNet API Error
Method 1: Install using TWRP Recovery
Steps to Install TWRP Recovery:
Watch The Video on How to Download & Install Magisk Manager and Root your phonePre-Requisite:
- Download the latest Android USB drivers [Here is the guide on how to install Android USB drivers]
- Download TWRP Recovery for your device from the here
- Download ADB drivers on your PC and extract them to C:/ drive.
- You need to Unlock the bootloader on your device.
- First of all, Install ADB and Fastboot on your PC.
- Enable Developer Mode on your Android device by tapping continuously on Build Number on your phone About Phone settings.
- Open up the Developer Settings, find the OEM Unlocking settings and toggle it on.
- Next, you need to unlock your bootloader. If you’ve performed an advanced tweak on your device before, you’ve probably done this, and you can skip this step. Note that unlocking the bootloader will wipe your device data.
- Run adb on your PC with your device connected via USB cable.
- If your smartphone is running on Lollipop (Android 5.1) or lower, run the following commands
fastboot flashing unlock
- Use your Volume buttons to move up and down and highlight Yes, then press your power button to confirm the process, and your bootloader will be unlocked.
- Download the latest TWRP image file here and extract it into the same folder in which you installed ADB and Fastboot.
- Power off your device.
- Boot the device into the bootloader. To do this, press the Volume up and Power buttons together until the bootloader menu comes up.
- Connect the device to your PC via USB.
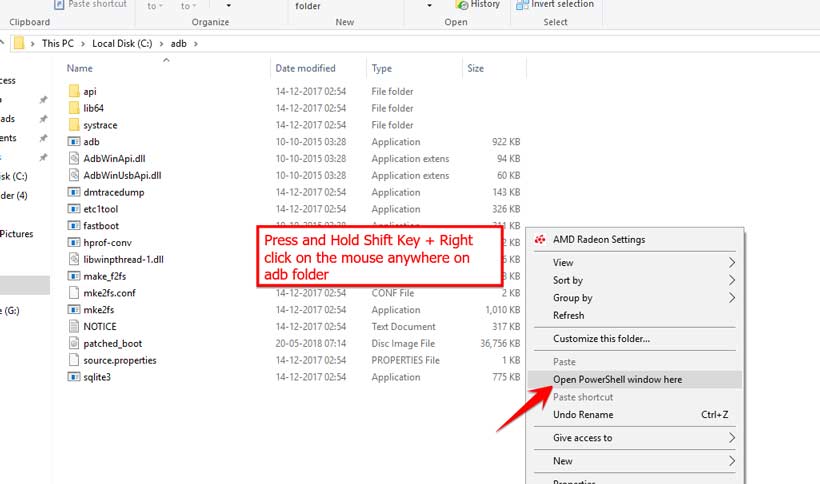
- On your PC, navigate to your ADB installation folder. Right-click on any space within the folder while holding the shift key on your keyboard, and click the Open command window here.
- Run the following command in the open command prompt.
- The flashing process will begin. Once done, run
Install Magisk using TWRP Recovery
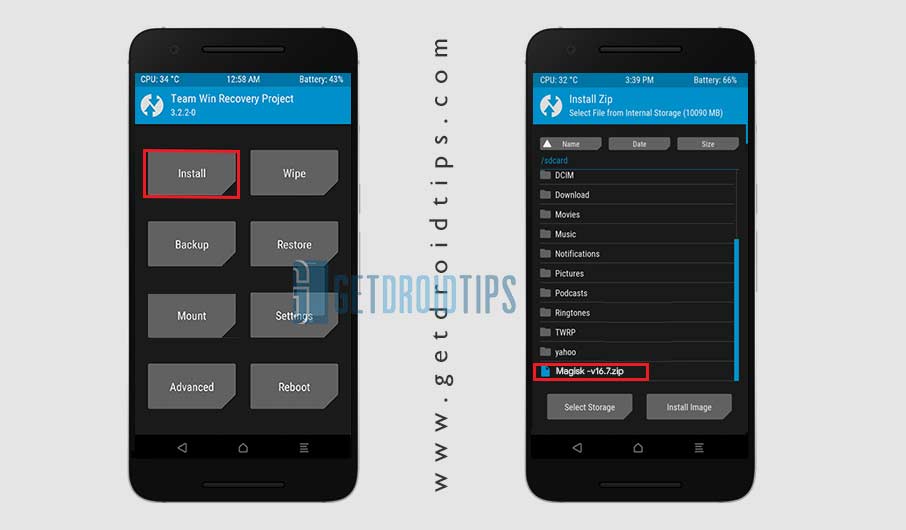
- If you already moved the latest Magisk zip to your internal storage root, you can simply boot into TWRP Recovery.
- In TWRP Recovery Interface, Tap on Install Button.
- Navigate to internal storage where you transferred or downloaded the Magisk zip file and proceed. Tap on the file and proceed.
- Once selected, Now you have to Swipe to confirm the flash.
Also Read
There exist quite a lot of benefits associated with rooting your device via Magisk. The first and foremost is the fact that it doesn’t tweak your device’s /system partition. As a result, SafetyNet wouldn’t be tripped, and apps like Google Pay and Pokemon GO will work without any issue. Apart from that. Some apps refuse to work on a rooted device. In that case, you could use the Magisk Hide functionality. This hides root from your selected apps, and it will then function as it does in a non-rooted device.
Well, rooting does bring in a lot of goodies with itself as well. These include the ability to try out Magisk modules, Xposed Framework, or give your device a complete overhaul via Substratum Themes. Likewise, you could also remove unnecessary apps (bloatware) that come pre-installed on your device. Taking a complete device backup via Titanium backup or flashing a custom Kernel to overclock the device’s CPU are some of the other benefits. There is no end to the benefits that a rooted Android device brings with itself. And Magisk plays an extremely crucial role in all this.
Google SafetyNet is the main reason why many people use this tool over other methods like SuperSU, Kingoroot, etc. Google’s SafetyNet detects when the system has been tampered with and blocks certain apps from working properly, such as Google Pay, Netflix, and Pokemon GO, are a few examples. Unlike SuperSU, which only grants or denies root permissions for specific apps, Magisk can hide root from an app completely. By hiding the root from an app, banking app, or Pokemon Go on your rooted device can work if you’re rooted.
Google SafetyNet is the main reason why many people use this tool over other methods like SuperSU, Kingoroot, etc. Google’s SafetyNet detects when the system has been tampered with and blocks certain apps from working properly, such as Google Pay, Netflix, and Pokemon GO, are a few examples. Unlike SuperSU, which only grants or denies root permissions for specific apps, Magisk can hide root from an app completely. By hiding the root from an app, banking app, or Pokemon Go on your rooted device can work if you’re rooted.
You may further download various modules from the official repository or from here.
Also Read: Best Magisk Modules You Should Try in 2021Magisk Manager v8.0.7:
Magisk Manager v8.0.4:
Magisk Manager v8.0.0:
Latest version Magisk 22 and Magisk Manager 8.0.7
There are two methods to install this on your device. If you have TWRP Recovery, then you can now flash the flashable zip without any hassle. All you have to do is download the latest version from the link given below to enjoy systemless root and their benefit on your device. Also, make sure to download the latest Magisk Manager apk file.
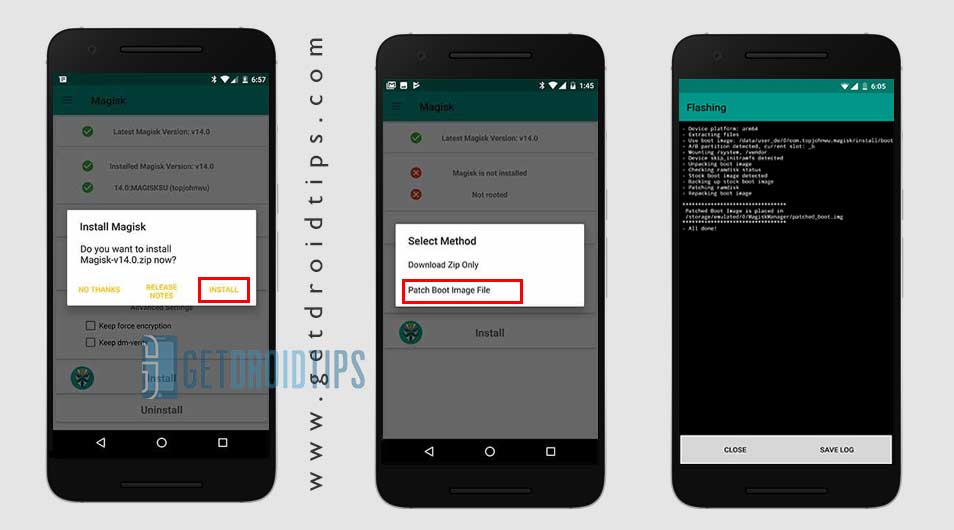
There are several ways to install Magisk on your Android smartphone, and the one you go for depends on your device’s current status. If your phone is not rooted, you can install Magisk and gain systemless root access on your device in one pass by using TWRP Recovery. If you don’t have TWRP Recovery, you can either install the TWRP recovery or simply follow the second method by patching the stock boot image (kernel) and flashing the modified boot on your device.
Also Read
If your phone is already rooted and you want to use Magisk, you can unroot your phone, remove all existing root software on your phone, and then install Magisk using TWRP. Here is the complete guide on how you can switch over from SuperSU to Magisk. I’ll be covering all of these methods in this guide.


Comments
Post a Comment